Changing Outbound Caller ID
Caller ID (cid or clip), the number presented to the receiving party when making a call from your Tronic VoIP service, can be set to any phone number on your account, or to any number that can be verified as being owned by you (this is sometimes referred to as overstamping).
Changing The Account Default
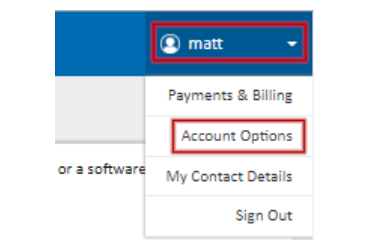
To set the default Caller ID for your account, select the account menu at the top right of the My Account Portal at https://voipportal.com.au/, then choose Account Options.
In the Default Caller ID field, select the phone number that should be shown on any outbound calls, for example the main office phone number. This will be the caller ID used on any extensions with the caller id set to ‘Default’ This can also be set to Anonymous, if desired.
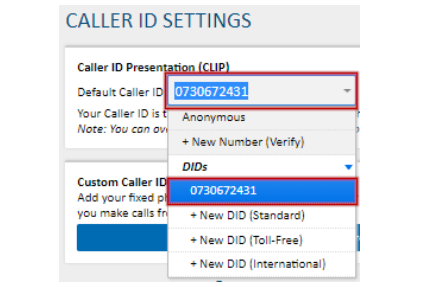
The caller ID presented by an extension can be changed from the account default by editing the SIP trunk or PBX extension, then selecting the desired caller ID from the Caller ID field. For instructions, see Portal Guide – PBX Extensions and Sip Trunks
You can set a custom caller ID of any number you own, even if it’s not on your Tronic account. To do see, please see Adding a Custom Caller ID below
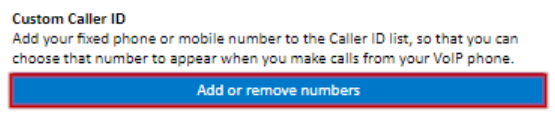
Adding a Custom Caller ID

To add a fixed phone or mobile number you own to the available caller ID list for overstamping, navigate to Account Options from the account menu at the top right of the My Account Portal at https://voipportal.com.au/
Under Custom Caller ID, click Add or Remove Numbers

Enter the phone number to verify, including the area code (eg. 0712345678) and click Call Me
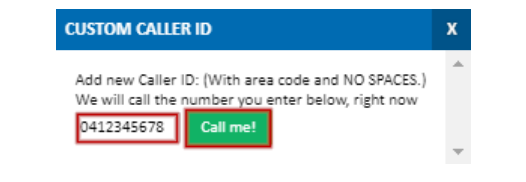
For a mobile phone, an SMS message with a verification code will be sent to the number. Enter the verification code, then click Complete Verification

For a fixed phone or other landline number, a phone call will be placed to the number entered. Please answer this and enter the verification code, then click Complete Verification

The verified number will now be selectable as both the account’s default caller ID and in the
SIP trunk or PBX extension options.
Removing a Customer Caller ID
If you no longer own a phone number that has been verified for custom Caller ID, it can be removed from the caller ID list from the Account Options section of the Account menu, at the top right of the My Account Portal.
Under Custom Caller ID, click Add or Remove Numbers.
You will be shown a list of all previously verified numbers. To remove one, locate the number, ![]() then click the icon.
then click the icon.