
Portal – Queues
Call queues take incoming calls and place them in line to be answered by a group of extensions, while playing hold music to the caller.
To create a new queue, click the Add Call Queue button, then check the below configuration options to configure your queue.

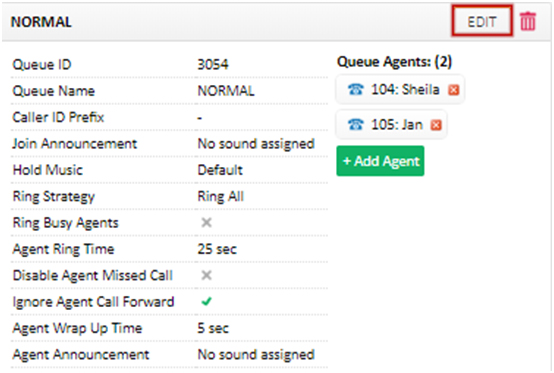
The configured queues section lists all previously created call queues, with an overview of their current configuration. To edit a call queue, click Edit in the title bar of the queue you wish to change.
Queue Configuration Options
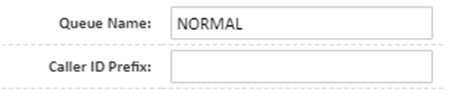
Queue Name is the name displayed in other PBX areas, when selecting queues as the destination type.
The Caller ID prefix field allows you to set a string that will show on each agent’s phone when receiving an incoming call. This is generally used when identifying multiple queues that an agent may be a member of, for example Brisbane (‘BNE’) or Melbourne (‘MEL’). For more information, see What is a Caller ID Prefix?
Sounds
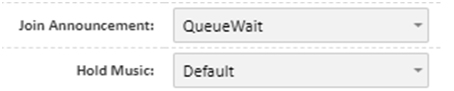
A Join Announcement is a sound file which, if enabled, is played to the caller when they first reach the queue. For example “Thanks for calling Company X. Please hold and we’ll be with you shortly”. This option lists any sounds currently on your service, along with the options to upload or record a new message.
Hold Music provides the choice of music the incoming callers will hear while waiting to be connected. This may be a hold music playlist you’ve created, or the default hold music supplied with your PBX. Selecting + New Hold Music Playlist will provide a dialog to upload a new set of music for this queue.
Queue Interrupts
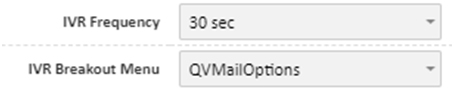
IVR Frequency works with the IVR Breakout Menu and sets how long a caller should be queueing before they’re presented with the IVR options.
IVR Breakout Menu, along with IVR Frequency allow an IVR to be presented to a caller after they’ve been waiting in the call queue for the number of seconds set in IVR Frequency. An example use case is, if a caller has been queueing for 60 seconds, an IVR will play allowing them to press 1 to leave a voicemail, or to continue holding. This field lists any existing IVRs on your PBX, along with the option to create a new one.
Queue Timing
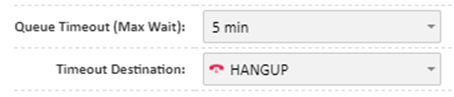
Queue Timeout (Max Wait) sets the maximum amount of time a caller can be in the call queue without being answered. When this time is reached, the call will be passed to the Timeout Destination set below.
Timeout Destination is the target for any calls that have reach the maximum wait time of the queue (set in the Queue Timeout). This can be any destination on the PBX, an external number, or to simply hang up.
Queue Members
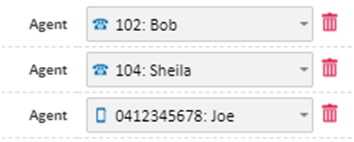
To add an agent to the queue, click the Queue Agents + icon the appropriate number of times for the count of the agents you will be adding.
For each Agent field, select the desired member of the queue.
You can remove an agent in the queue by clicking the ![]() button corresponding to the agent you wish to remove
button corresponding to the agent you wish to remove
Advanced Options
Agent Options
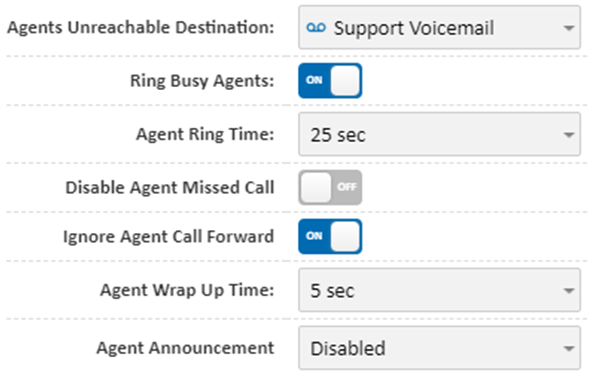
Agents Unreachable Destination specifies where a call should be sent if all agents in the queue are offline (for example, in case of a site internet outage)
Ring Busy Agents will, if disabled, check an extension’s status when a call arrives in the queue and, if they’re on the phone, will skip ringing their extension. If enabled, the call will be presented to the extension in a call waiting fashion. This setting works in conjunction with Agent Ring Time
Agent Ring Time specifies how often to ‘reset’ the call to an extension. If an extension is offline, and a call is in the queue, once the extension reconnects and the ring time expires, the queued call will ring that extension.
Disable Missed Call will prevent the member extensions from showing a missed call if the call is answered elsewhere or when the agent ring time setting resets the call.
Ignore Agent Call Forward is a recommended setting that will prevent a call forward on any of the member agents’ handsets from interrupting the call flow. With this disabled, a call forward on a phone handset may take the call out of the queue and pass it directly to the forward destination.
Agent Wrap Up Time specifies the amount of time between an agent hanging up a call and a new call being passed to them. This allows time for CRM reset, etc.
Agent Announcement is a sound file which, if enable, is played to the agent when they answer the call. This may be a reminder prompt (‘remember to ask their post code’) , or a message stating which queue the call came from (‘this is a sales call’)
External Agent Settings
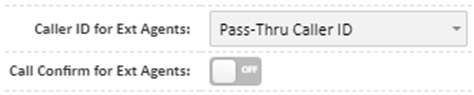
Caller ID for Ext Agents provides a choice of the phone number that is presented to any external number that is a member of the queue. This can be any of the currently configured phone numbers or verified caller IDs, or Pass-Thru, which will send the original caller’s phone number to the external number.
Call Confirm for Ext Agents, when enabled, prompts external agents to accept calls by pressing 1. This will prevent the calls being directed to the mobile’s voicemail box, or the queue being interrupted by a ‘number is switched off’ message.
Queue Position Controls
Announce Position/Hold Time instructs the system to periodically play a message to people waiting in the queue, at the frequency set, and requires one or both of the below options.
Announce Position advises the caller how many callers are in the queue to be answered before them
Announce Hold Time provides the caller with an estimate of how long it will take until they’re connected to an agent, based on previous call times.

Queue Callback
Press 9 Callback allows callers to reserve their place in the queue by pressing 9. Ensure you have an announcement in place advising callers to press 9, either at the start of the queue, as part of your hold music playlist, or through an IVR breakout.
If a user opts to press 9, they’ll be asked to confirm their current number (1) or enter a different callback number (2).
When they make it to the front of the queue, the call is transferred to an agent, who then uses the following keys to manage the callback:
| 1 | Place the callback to the client |
|---|---|
| 9 | Return the callback to the queue for another agent |
| # | Once 1 has been pressed to place the callback, # at any time returns to the callback/return to queue menu |
| Hangup | Cancels the callback |
Deleting a Queue
To delete a queue, click the remove button (RED BIN) in the header of the queue you wish to remove.
Note: Once removed there is no restore function

Login and out of the Queue
Agents can also login and logout of the queue from there handsets. This can also be a cloud softphone user
This is great for users that only occasionally answer calls in the queue or for shift workers where different people answer the phone at different times of the day and don’t want there phone always ringing.
NOTE: For agents to use this feature you need to make sure that user is not manually added to the queue in https://www.voipportal.com.au/
|
*58XXXX Note: XXXX is the queue ID |
Queue LOGIN |
Dial *58 then the Queue ID (Highlighted in yellow below) to join a queue as an agent. You can find the Queue ID in up the top of the queue area in https://www.voipportal.com.au/ |
|
*59XXXX Note: XXXX is the queue ID |
Queue LOGOUT |
Dial *59 then a Queue ID (Highlighted in yellow below) to leave a queue as an agent. You can find the Queue ID in up the top of the queue area in https://www.voipportal.com.au/ |
Once the agent is logged into the Queue there name will be added to the Queue and highlighted in yellow to know it was added via login/logout method.
See highlighted green area in below picture for where users are added in queue area in https://www.voipportal.com.au/
