3CX StartUP by Tronic Cloud

Administration Guide

Downloadable – 3CX Quick Reference Guide

Download Quick Reference Guide Here


3CX StartUP Administration Guide

Go to 3CX General User Guide

Signing in and going to Office Settings

You can configure your phone system from the “Office Settings” page. You can get to it from within the Webclient. If you have not done so already, sign in to your webclient. We gave you the link at the end of the wizard and sent you an email.

    1. Open your welcome email (Subject: Your User Account on your New 3CX System)
    2. Click on the URL. The login URL should look like this approximately
      https://PBX.3cx.com.au/webclient/

                Where PBX is the 3CX system name provided by Tronic

    1. Login with your Google account. The same account you used to sign up with 3CX.
    2. Now click on the “Office Settings” button on the left hand side.

Setup your team

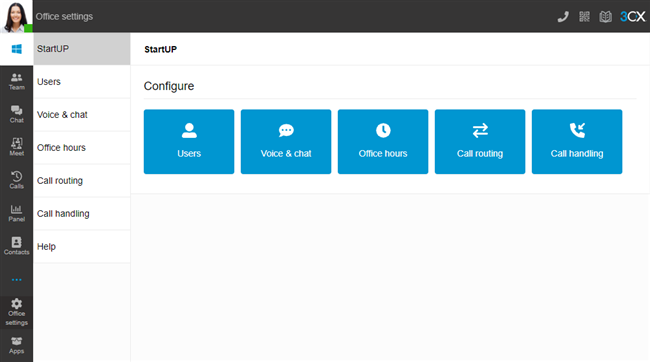
Next up is to setup your users on your new 3CX system:

  1. Go to “Office Settings > Users”
  2. Click on the “Add User” button
  3. Specify email and name
  4. Select ROLE – now this is an important one. You are set up as the manager, so you can do the kind of things you are doing now like creating users. If you make another user a manager, he/she can do the same. If you select user, then they can only manage their own account, they will not see the “Office settings” pages. Furthermore, they can only see their own calls, not anybody else’s. You can see all- calls! If you want a user to see and manage calls and live chat for everybody, but not configure the system, make them a receptionist.
  5. Each user gets assigned a 3CX Talk link. More about that below.
  6. Click “Save” to create the new user. Continue creating all the members of your team.
  7. Your team members will get an email with their own login details. Tell them to install the apps!

3CX Talk – Links

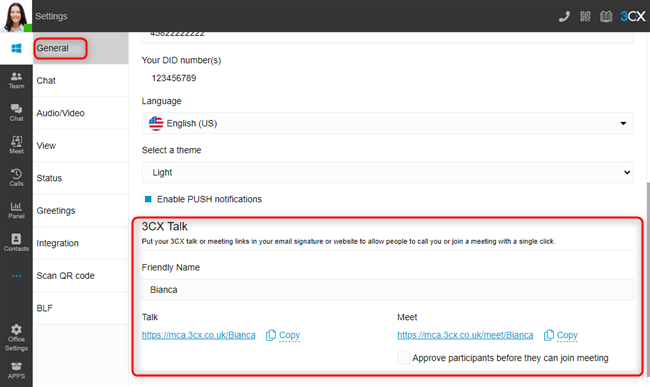
3CX Talk links are weblinks that allow people to call you or your company just by clicking on the link. No need to dial a number or more importantly pay for the call. The visitor does not need any special app either, it works pretty much from any browser be it on a computer or a smartphone. (Using WebRTC)

Each user gets their own 3CX Talk link that they can put in an email signature or send out to whom they wish. You also get a company Talk link which you can paste on your website or in your company email signature to allow people to call you just by clicking on the link. No need to copy and paste a number or pay for 1-800 charges. Example 3CX Talk links:

https://PBX.3cx.cloud/mariajohnson/

https://PBX.3cx.cloud/mycompany/

Where PBX is the 3CX system name provided by Tronic

Users can find and edit their 3CX Talk link ‘friendly name’ in “Settings > General”.

To find your company’s 3CX Talk link

  1. Go to “Office Settings > Call Handling”
  2. Click on your desired call queue or ring group.
  3. Click on the “3CX Talk” tab
  4. Edit the friendly name and copy the updated talk link.

3CX Meet

By sharing the “meet” link, visitors can go directly to the meeting room of the person to start an ad hoc Video Conference:

https://PBX.3cx.com.au/meet/mariajohnson/

To avoid spam calls, you can request Name and Email first and accept or reject the call based on that.

Handling (Routing) Inbound Calls

Office Hours & Holidays

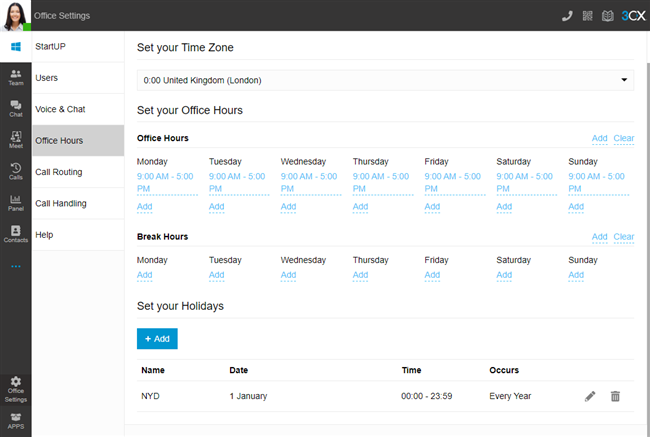
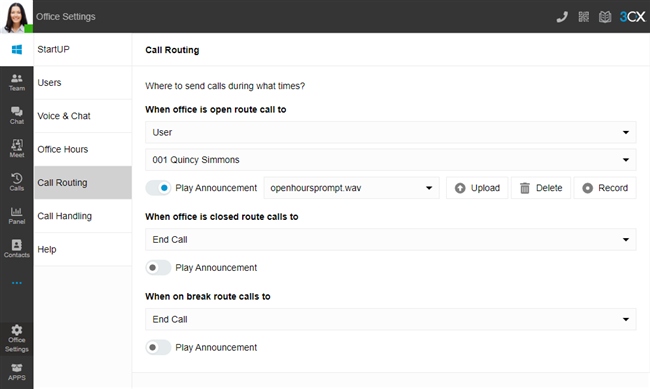
You probably don’t want calls to ring your mobile in the middle of the night. Lucky for the office hours function then. Here you can configure when your business is open, when you are on break and where to send calls when you are closed. To configure your office hours:

  1. Set your time zone
  2. Click on the days and specify your opening hours
  3. Add any breaks you might take

Do you go on holiday? OK, then you can configure these days here and have your calls handled as if your office is closed. Just click on the “Add” button below Set your Holidays and specify date and time.

Specify a destination for calls

Now you can specify call destinations during office hours, when your office is closed or when you are on break or holiday. You can send it to a Ring group, an extension, voice mail, Digital receptionist or queue.

Play announcements

How about welcoming callers while they wait for you to take a call? Pretty cool right? To configure this:

  1. Go to “Office Settings > Call Routing”
  2. Toggle the “Play announcement” slider on.
  3. Now record what you want to tell your callers. Something original like “Thank you for calling Company XYZ”. To record your greeting:
  1. Click the “Record” button
  2. Enter your desired file name and click the “Record” button
  3. The popup will show your recording time. When finished, click the “Stop” button.
  4. You can now listen to your greeting, re-record it or click the upload button to save.
  5. Your recording will now be shown in the drop-down box.

Note: If you do not see the “Record” button, ensure your microphone is properly configured and allowed in Settings > Audio/Video.

  1. Repeat this with a different announcement for when you are on break or when your office is closed.

Or if you already have an audio file, you can upload your announcement as a WAV file. If you have a music file that does not fit the required audio format, you can use our audio convertor tool.

How you can override Open, Closed or Break mode

Got into work early and want to open the office? You can override the open office hours from the account menu in the webclient. Of course you can do the same thing to close the office early.

  1. Click on your avatar
  2. Select “Override Office Hours”
  3. Use the drop-down to select one of the pre-set statuses or create a “Custom” one, and choose the duration.

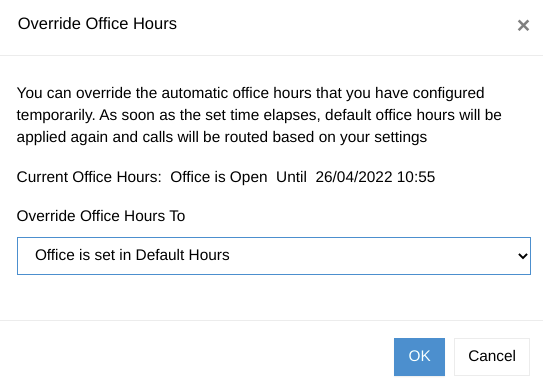
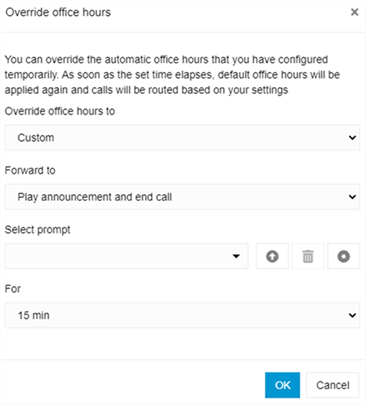
Note: When changing the “Office hours” the call routing that has been set for each status “Open”, “Closed”, and “On a break” will automatically take effect for the specified duration. This does not apply to the “Custom” where you must set the call routing options during the selection process.

  1. Click “OK”
  2. Now it will show until the override is in effect. After the time elapses the default office hours will come into effect again.

Play a custom announcement and end the call

Sometimes you need to play a one-off custom greeting to the caller and end the call. This could be used during fire drills or some other emergency.

  1. Click on your avatar
  2. Select “Override office hours”
  3. Choose “Custom” from the drop-down list
  4. Under the ‘Forward to’ drop-down list, select “Play announcement and end call”
  5. Either choose your prompt from the existing available greetings, upload a pre-recorded greeting or use the record button to record your new greeting.
  6. Choose the duration and finally click “OK”.

Call Handling

Configure your Ring group

Customers can call your company/team by calling the assigned number or by clicking on your 3CX Talk link. Once they do so, 3CX will forward the call to your ring group. By default, this ring group consists of all your team members and it will ring these team members one after the other. That way, if one is unavailable, another team member can answer. You can change this behavior and exclude team members from the ring group. To edit your ring group or create new groups:

  1. Go to “Office Settings > Call Handling”
  2. Click on your existing ring group or click “+ Add Ring Group” to create a new group
  3. If you are creating a new group, type a name. Something like “Sales Team”
  4. Specify what should happen if no one answers the call. By default, it will go to the voicemail of ALL ring group members after 60 seconds of ringing. That means each user will receive the same voicemail.
  5. Edit the ring strategy –
  1. “Ring all” – does what it says – ring all group members at the same time until someone picks up or the 60 second timeout is reached
  2. “Prioritized hunt” – means it will start with the top group member and proceed down the list. That means that the first ring group member will receive each and every call!
  1. If you want to exclude some people from the ring group, click on X next to their name.
  2. If you selected Prioritized Hunt then move the ring group members up or down depending whose phone you want to ring first.

Configure a Queue

Queues go way beyond ring groups and are much cooler. A queue will take the call and put the caller in queue if you cannot take the call immediately. To configure a queue:

  1. Go to “Office Settings > Call Handling”
  2. Click “+ Add Queue” at the top of the screen
  3. Under the “General” tab:
  1. Give your queue a name
  2. Specify what should happen if no one answers the call. By default, the call will be ended
  3. Choose your maximum queue wait time. That’s the length of time a caller will be held in the queue before their call follows the “Destination if no answer” route
  4. Edit the polling strategy. You can choose from 9 different options in the drop-down list
  5. Use the “+ Add Agent” button to choose which team members will be part of the queue. Watch out for the order of agents as some of the polling strategies work from the top of the list to the bottom. E.g “Hunt by Threes Prioritized” calls the top 3 agents, then the next 3 in the list and so on
  1. Under the “Music” tab
  1. Choose if you want an Intro Prompt. This is a greeting that is played as soon as a caller enters the queue. You can upload a greeting or choose to record your own. See the Play announcements section above for instructions on how to record your own greeting
  2. Upload or record your choice of music on hold. If you have a music file that does not fit the required audio format, you can use our audio convertor tool 
  3. Toggle the option on to announce the queue position every 60 seconds to the caller
  4. Queue language will display the languages available for the automated greetings
  1. “3CX Talk” lets you name the 3CX Talk Link for the queue, and lets you choose the information you want customers to provide prior to the call being initiated. Once configured, copy the URL and use it in email signatures, websites or digital business cards
  2. Under the “Advanced” tab:
  1. Configure a service level agreement (SLA) time so that you can report how long it is taking calls and chat messages to be answered
  2. Choose how chat messages are assigned either manually or select “auto-assign” to ensure chats are marked as “taken”

Call recording can be enabled and callers can be offered the chance to opt-out by pressing the number 3 on their keypad.

Configure a Digital Receptionist

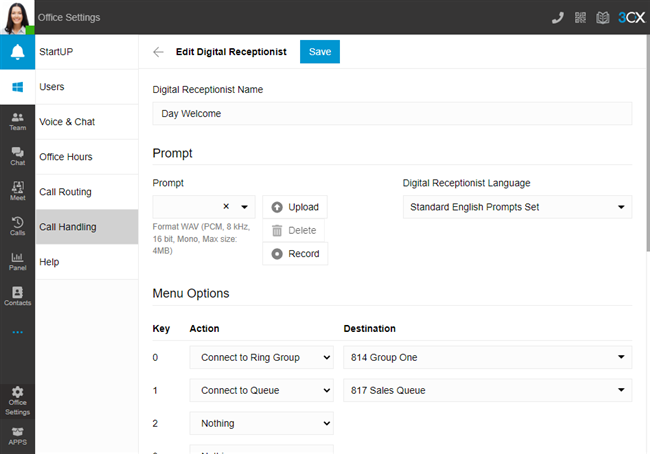
The inbuilt digital receptionist can just route based on time. If you want to create different queues or ring groups for different departments and want to allow the caller to choose which department to speak to, then you can create your own digital receptionist. To create a digital receptionist:

  1. Go to “Office Settings > Call Handling”
  2. Click “+ Add Digital Receptionist”
  3. Give your new digital receptionist a name like “Day Welcome”
  4. Upload or record your greeting. Something along the lines of “Thank you for calling XYZ, press 1 for sales and 2 for support”
  5. Select the desired action to be mapped to each key press, using the action dropdown menu.
  6. Once you have finished configuring your menu options, scroll to the bottom of the page and choose the options and actions if callers press incorrect or invalid options

Configuring Live Chat

During setup you configured live chat for your website. Incoming chats and calls from your website were automatically configured to be sent to your ring group. If you want to change this, or set up additional live chat bubbles on other websites, you can do this here.

To add a live chat:

Go to “Office Settings > Voice & Chat > Add Live Chat”
Configure the Live chat bubble, see 3CX Live Chat configuration guide for more information.
If using WordPress, install the plugin on your website and copy and paste the 3CX Live Chat URL
See 3CX guides if using Drupal, Joomla, Squarespace, Weebly or Wix

Configuring WhatsApp

Configure a WhatsApp number onto your StartUP account allowing you to reply to messages directly from the Web Client.

Note: 3CX can not create a new message to Whatsapp users at this time and is designed to receive and reply to Whatsapp messages.

You must have a WhatsApp Business account set up with a phone number added. This number should not be registered to any other existing WhatsApp account, whether it be virtually or on any physical device. To add WhatsApp:

  1. Create a WhatsApp application on the Meta Developers portal
  2. Optionally add a phone number to the new account
  3. Set up an admin role and allow it full account access
  4. Generate a token
  5. Configure in 3CX by navigating to “Office Settings > Voice & chat” and then click on “+ Add WhatsApp”.
  6. Copy your webhook from 3CX and paste it into the Meta developers portal
  7. Send a message to the number you set up to test functionality.

See the 3CX WhatsApp integration guide for a full breakdown of the steps.