Time Switch Setup
Time Switches allow customers to setup ways to change Call Routes of their incoming numbers, either automatically, or via their VoIP handsets.
Standard Setup
To create a new Time Switch for your account, head to the ‘Time Switch’ tab under the Hosted PBX option on the left hand side of the My Account portal.
If you wanted the Time Switch to work Automatically, simply choose the days and time you wanted each position to run.
To create additional positions, simply click the blue + symbol.
Once you have set the desired positions, click Save to create the Time Switch. A status of your Time Switch will be shown on the main ‘Time Switch‘ page, to allow you to see the ‘Current Route‘ and ‘Next Route‘.
NOTE: Once you have created your Time Switch, make sure to route your number/numbers to the Time Switch from the ‘Number Routing’ page.
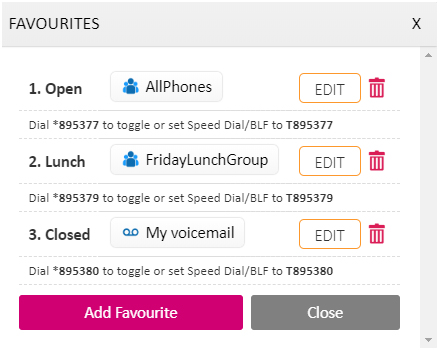
Creating Favourites
To create Time Switch Toggles for handsets, first you’ll need to Edit the Time Switch, and create ‘Favourites‘ on the ‘Configure Favourites‘ button.
Once the Favourites are created, you can set the Dial toggle for Speed Dials on the phone, or the BLF Toggle for BLF lines on the phone.
NOTE: If your Time Switch is set to automatic, changing the route with a favourite will only override until the NEXT automatic position.
Manual Toggle (Night Switch)
To have the Time Switch set to MANUAL ONLY, simply set the ‘Override?‘ position of the Time Switch to ‘Manual’, and use the favourites/toggles on the phones.

Common Night Switch and Time Switch Scenarios
Night Switch Scenarios
Basic Night Switch
Add Two Favourites and no time conditions, and save one or both as Speed Dial/BLF into the phone. Both will work as toggles to swap to the other, so only one key is required as BLF on the handset.
Example: Favourites: “Day”, “Night”. A single BLF Key for Open can be saved on the phone. Pressing the button will toggle between Day and Night.
Night Switch with several favourites
Add several favourites and no time conditions. Each favourite must be present on the phone as a Speed Dial/BLF to switch it, toggle functionality is not available
Example: Favourites: “Open”, “Out to Lunch”, “Closed”. Pressing any of the favourites will switch it to that favourite. No toggle is available, so all options but be available as BLF keys or speed dials on the handset.
Night Switch with several favourites and ‘default’ option
As above, except add a Time Condition for with any settings to set the ‘default’ option. Switch must be in Manual mode. Pressing a favourite twice will toggle back to the ‘default’ position.
Example: Default Time Switch Condition: “Closed”. Favourites: “Open”, “Out to Lunch”, “High volume of calls”. Pressing any of the favourites will switch it to that favourite, and pressing it again will toggle back to “Closed”.
Use case: Useful to save buttons on the phone.
Night Switch with several favourites and automatic reset to ‘default’ option
As above, except add a Time Condition for with any settings to set the ‘default’. Switch must be in Automatic mode. Pressing a favourite twice will toggle back to the ‘default’ position. Switch will automatically return to default position at the designated time.
Example: Default Time Switch Condition: “Night” set daily for 5:30pm. Favourites: “Day”, “Out to Lunch”, “High volume of calls”. Pressing any of the favourites will switch it to that favourite, and pressing it again will toggle back to “Night”. The switch will automatically return to “Night” at 5:30pm each day.
Use Case: If staff forget to close the Time switch at the end of each day, the time switch will automatically be reset to the “Night” favourite.
Time Switch Scenarios
Open or Close early (Time Switch in Auto Mode)
Press the Speed Dial/BLF of the favourite to add a timed override until the next scheduled time condition. Pressing again toggles back to Automatic Mode.
Can also be used if you have a higher volume of calls than usual, or an extended lunch break, knowing that it will return automatically at Close of business.
If you change the Time Switch to Manual mode via the web portal, dialling the favourite will keep the Time Switch in Manual mode.
PBX Setup Example, Queue with Time Switch
+9-This example will take inbound calls to a number, check if the business is open and, if so, pass the call to a queue of several extensions.
If a call during business hours is unanswered, it will then go to voicemail.
If the business is closed, the call will instead go directly to a voicemail box.

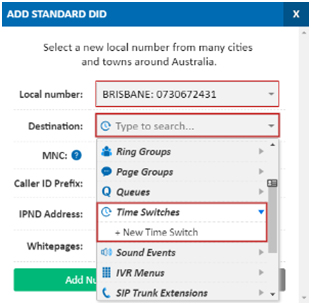
On the left hand side, choose Number Routing. If you already have a number you wish to use for your main number, for example if you’ve ported a number in, please click ‘Edit’ corresponding to this number. Otherwise, please select Add a Number and select your location. To begin setting up the above, create your extensions.
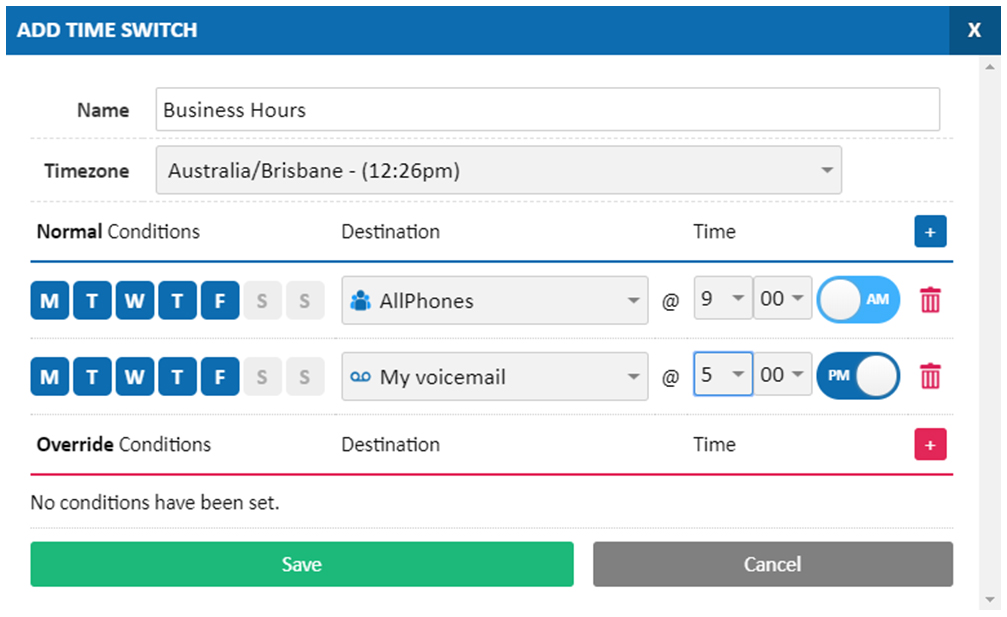
In the Destination field, choose Time Switches, then New Time Switch.

Provide your time switch a memorable name, for example “Business Hours”, then select the time zone this will apply to. For the first rule, select the days of the week and the time at which your office opens. In this example, we’ll be setting Monday – Friday, 9AM – 5PM.
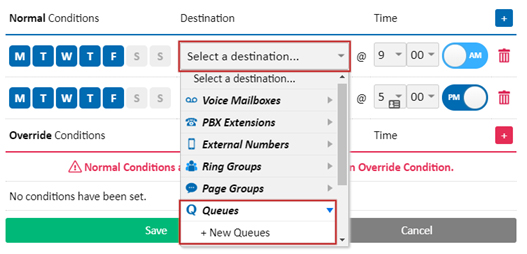
For your ‘Open‘ event, (the one set to 9AM in this example), choose Select Destination, then Queues, New Queue. If you have previously configured a queue, you may instead select your exiting queue here and skip the next step.
Set your Queue Name to something recognisable, for example Main Number, or Incoming Queue. In the Queue Timeout field, select the maximum amount of time a caller can be in the queue before they are sent to the voicemail box.

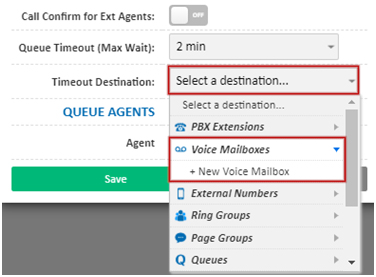
Still within Queue Settings, click Timeout Destination, then select Voice Mailboxes and New Voice Mailbox. If you have an existing mailbox you wish to use as the voicemail for the queue, please select that here and skip the next step.
Provide a Description for this mailbox, for example “Queue”. If you wish to customise the greeting customers hear, select the Greeting dropdown. You can either select an existing audio file on your PBX, choose a file from your computer (New Sound (Upload)), or use your phone handset to record a voicemail greeting (New Sound (Record)). This is useful if you would like to replace the default unavailable message with a personalised greeting, for example “Thank you for calling the T-Shirt company. We’re all on the phone, but please leave a message and we’ll get back to you promptly”.
To have any voicemail messages left transcribed and sent to your mobile as a text message, please enter you mobile number in the SMS To field. If you would like a notification in your email when a voicemail is left, set Email To to your preferred email address. By default we will attach the recording of the voicemail message to the email, but if you would prefer this not to happen, set Attach VM to email to No.
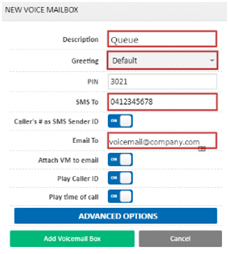
Once complete, click Add Voicemail Box and answer Yes in the confirmation prompt.
You will now be returned to the Queue settings, and will see the new mailbox reflected in Timeout Destination. To finish configuring the queue, click the + button for Queue Agents, once for each extension you wish to have in the queue. For example, if you have 3 helpdesk extensions, click this 3 times.
For each added agent, click the dropdown box, then select PBX Extensions and select the extension to add.
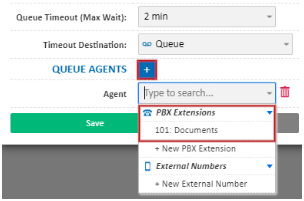
Once you have added all your agents, click Save and answer yes to the confirmation prompt.
You will be returned to the Time Switch configuration. For your closed event, click Select Destination, then Voice Mailboxes. If you wish, you can re-use the one previously created, or alternatively you can create a new mailbox for after hours calls, in case you wish to have a different mobile number or email address for the receipt of voicemail. If creating a new one, please repeat the New Voice Mailbox step above, using the appropriate details.
Once complete, click Save on your Time Switch configuration. Your calls will now follow the dial plan example above.

Override Conditions – Holiday Override
Override conditions are used to temporarily change your time switch actions, for example sending callers to a specific message on a public holiday.
On-demand Overrides
If you need to start an override immediately, for example if you’re having a meeting or a staff member goes home sick, you can temporarily change the route your time switch follows.
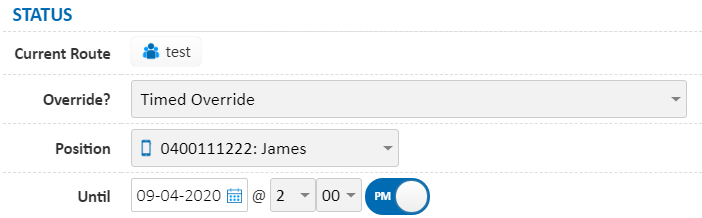
To do so, locate the Override? field under Status, then switch from Automatic to either:
Manual Override: follow the specified override until this field is set back to automatic or an override key on a handset is pressed.
Timed Override: follow the specified override until the end time specified, when the time switch will revert to automatic conditions.

For a manual override, simply choose the destination that any callers will be routed to. With a timed override, select both the destination any callers will be routed to, along with the finish date/time of the override.
For example, to send any callers to James’ mobile until 2PM on April 9th, select the following:
Scheduled Overrides
Scheduled override conditions are added ahead of time, and are generally used for passing callers to a specific announcement during public holidays, etc.
NB: It’s important to note that, on a day with an override condition set, none of the time switch’s normal conditions are run.
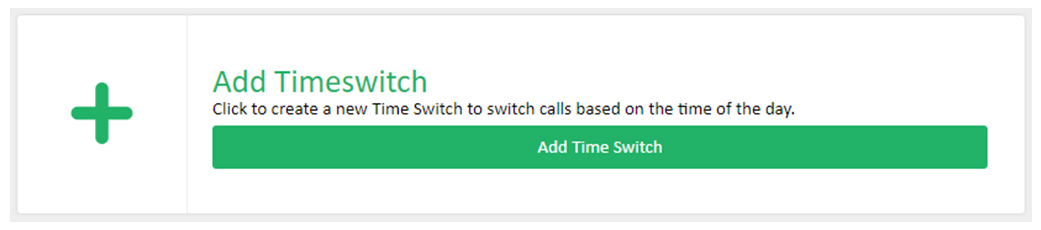
To add a new scheduled override, click the + button in the Override Conditions section of the time switch configuration.

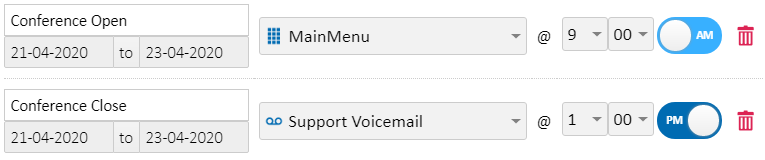
Provide a name for your override, then select the date range the override will apply on (note these dates are inclusive). From the dropdown, select where any callers should be sent during this override, then select your start time. If you’re only adding a single rule, you can leave this at 12AM.

In this example, all callers reaching the time switch between 12AM on the 10th April and 11.59PM on the 13th April will be routed to a message announcing the business is closed. For more information on sounds and announcements, please see Portal Guide – Sounds and Sound Events
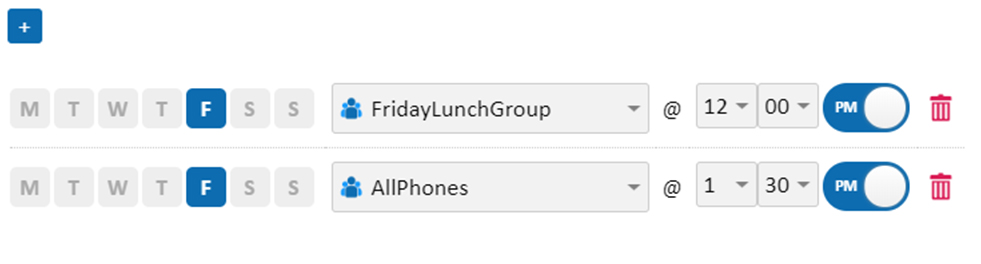
The override conditions can also handle multiple rules. As an example, if you’re reducing your normal opening hours to between 9AM and 1PM for a period of 3 days due to a conference, you can add two rules to override your normal open and close times, as follows: