
3CX Guide
3CX User Guide
Getting started with your 3CX system — the mobile apps, web client, video conferencing, chat, voicemail and Microsoft 365 integration.
Quick-start user guide
Downloadable - 3CX Quick Reference Guide
Download Quick Reference Guide Here
3CX StartUP Administration Guide
Go to 3CX StartUP Administration Guide
3CX on iOS or Android


- Get the app from the Google Play or Apple App Store.
- Open the “Your User Account on your New 3CX System” email.
- With the app, scan the QR code found at the top of the email.
- Your extension will be set up automatically in seconds.


The 3CX Client
Login to the Web Client
- Open the “Your User Account on your New 3CX System” email.
- Click the Web Client URL.
- Login with Google, MS 365, or use the credentials in the email.
Download the Windows Desktop App
- Click the Windows icon on the left menu > “Install”.
- Click “Provision” to automatically connect the App.
Manage your status & queues
- Set your status by clicking on your Avatar: 5 options available.
- Your status changes to yellow when your line is busy.
- Customize status / forwarding rules: “Avatar > Your Name > Status”.
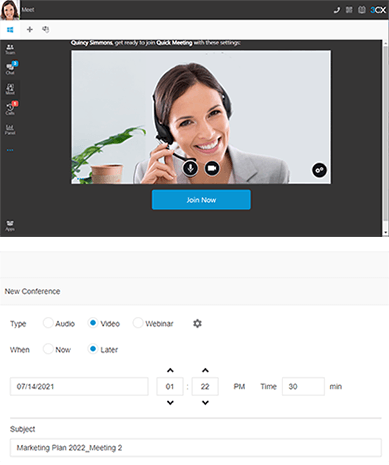
Video / Audio Conferencing
Create an ad hoc video / audio conference
- Open Web Client / Windows Desktop App > “Meet”.
- Allow 3CX to access your camera and microphone > “Join Now”.
- To invite participants, copy the link or share via WhatsApp, email.
Schedule a conference
- Click “+” in the top menu to create a video / audio conference.
- Fill in the details > select calendar > “Create Meeting”.
- Click on “Scheduled Conferences” to view them.
Turn any call into a conference
- During the call, select “Conference” in the phone dialer.
- Search by name or extension, or add a phone number.
- Select your participant/s and they will be automatically dialed.
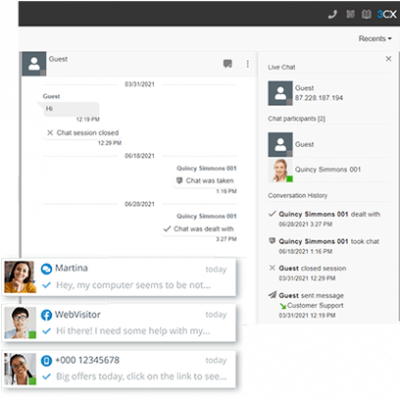
Managing Chat Messages
Start a chat
- Click “Chat” > “+” and select “Start a Chat” or “Create Group Chat”.
- Select the extension(s) to start chatting.
Receiving customer chat messages
- You can view chat conversations routed to queues assigned to you
- Distinguish Live chat, Facebook messages by respective icons.
Handling a chat
- Choose chat, click the menu
 and select between “Transfer”, “Take” or other options enabled by administrator.
 - To transfer the chat, search for agent by name or extension number.
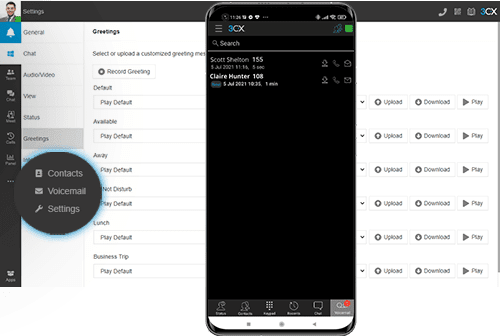
Voicemail
Set your voicemail via Web Client / Windows Desktop App
- Go to “Avatar > Your Name > Greetings”.
- Record a new greeting or upload a pre-recorded message.
- You can have different greetings per status.
Set your voicemail greeting via Deskphone
- Dial the voicemail number indicated in your user account email.
- Enter your PIN and then press “#”.
- Select option “9” then “8” and then “0” to record.
- Press “#” to end the recording and “0” to save.
Listen to your voicemail messages
- During the call, select “Conference” in the phone dialer.
- Search by name or extension, or add a phone number.
- Select your participant/s and they will be automatically dialed.
Using 3CX with Microsoft 365
Update your Status
- In Microsoft 365, go to your Calendar and add meeting.
- During meeting Status will update to “Away” or “Do Not Disturb”.
Launch calls from the Microsoft 365 interface
- Ensure you have the Desktop App installed.
- Click on any number in MS 365, for the dialler to initiate the call.
Create new contacts
- Create your contacts in Microsoft 365.
- 3CX will automatically sync with MS 365 to update contacts.
Need a hand with 3CX?
Our Melbourne-based team can help you set up and get the most from your 3CX system. Email support@tronic.com.au or visit the support hub.